I have moved my earlier notes on the banister to this new thread, dealing with the whole of the staircase construction, to make it consistent.
As for the stairs themselves, they are supported on a pair of steel rectangular hollow sections (3mm thick), after a lengthy discussion with the fabricator on section and thickness. There is minimal bounce and a pair of tubes is much less conspicuous than a single central tube, which needs to be quite large to prevent twist.
The fabricator installed the steelwork and over to me for the joinery.
The treads were 40mm cherry and, owing to the limited board widths available, needed to be jointed for each tread and then to the riser to bring the gap within building regs. I initially found the need for the riser disappointing, but it actually enhances the appearance in the finished job.
We start, as ever with the pile of timber and chop, as opposed to hand, saw owing to the quantity. There is a surprising amount of timber in a stair of this type, £700 worth in fact.
Into the workshop for initial preparation. Cherry can be quite variable with regard to hardness and I do not always reject all the sapwood as I think the use of a little can be quite attractive.
Once prepped the were edged with No 7, slightly hollowed with a smoother and double biscuited for alignment and a little reinforcement, considering the application. This was probably overkill as the glue will easily hold such wide edges but better safe than sorry.
Glue up used every cramp in the shop and most of the available space, but was straightforward once the preparation was complete. I matched the grain as best I could and numbered the boards for jointing.
I used the same procedure for the riser joint to ensure the minimum glue line.
I had to turn my long suffering temporary stair at right angles while we prepared the landing area and this meant a bit of a crawl to get to bed!
The treads were attached to the steel brackets with threaded inserts and the position was critical as there was little room to adjust in the brackets. I used a template and centre punched through before drilling to accept the inserts. The holes had to be made oversize as the cherry was so hard and the hex drive had a tendency to strip out before the nut was home. Fortunately I had been forewarned and did a few trial runs first on a piece of scrap.
The treads for the half landing took a little more working out with a couple of cut-outs to miss the frame sections and I finished the 45 degree angles with the low angle jack before assembly.
It all went together fine and was enjoyable, simple woodwork with such nice timber. It finishes really well straight from the plane so sanding is minimal.
The treads were drilled for the balustrades and finished in 3 coats of Bona Mega which seems glass hard and wears well whilst being water based is easy to use.
I started assembling from the bottom and was relieved the pre- installed lights ended up in the right place.
Ready for the stainless posts and glass.
I had trouble sourcing a 50mm round section cherry handrail so decided to make one up from two laminations and some circular spindle work
I jointed up and laminated some 75 x 40 cherry and clamped them together to try to get them to stay straight.
Having sourced some suitable knives I found the finished mould fouled the centre of the block as you can see from the witness.
The answer was to get the block into the metalwork lathe and machine some additional clearance in the centre section
4 overlapping passes were needed just leaving a witness on each face to be sanded away later. This was essential to avoid undercutting the shape.
Finally produced sufficient lengths for the job.
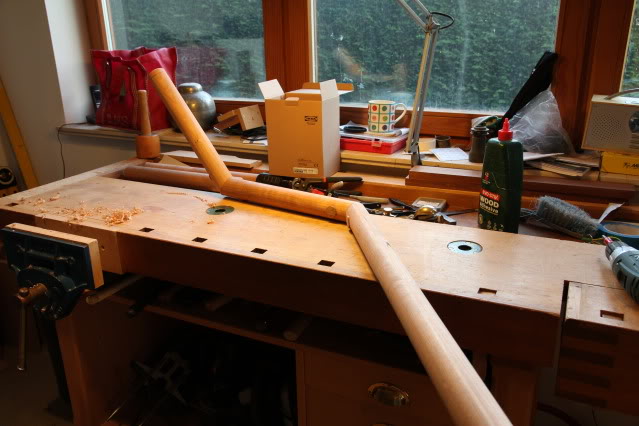
Having measured the angles I chopped the rail and joined with Zip Bolts, followed by taper plugs which worked very well.
A bit of carful bench work and a lot of trial and error finally produced a true fit for the bannister.
I used the same system for the landing balustrades and the atrium in the background.
All in all I learned a lot and am well pleased with the finished job. The materials were expensive but I achieved the appearance I wanted and it's there for the duration now.