I needed an enclosure for a small marine loudspeaker for use with a communications receiver. It was for my Dad, who had made the receiver, and I used an old piece of walnut from his grandmother's dining table which had been in the timber stores for some considerable time!
First surprise on cleaning up was that it was American Black Walnut and not English as thought. The table dates from about 1900 so we have been using ABW for some time!


As ever the bevel up smoother
made a good job but probably
not essential in this case as
ABW is fairly easy to work.

I intended to use skewed, splined
mitres with ebony splines, more
for the fun of making them, so
needed a mitre shooting board to
use my weapon of choice, the
low angle jack.


I glued and extra block against
the back fence to make sure
it stayed put!

Next stage in the timber prep was
to rebate the sides which I did
before cutting to individual lengths
My views of the excellent
skew rebate are already well known.

The jack ran well against the fence/groove arrangement but I later glued an angled guide against the groove to give it some wear life.

In this case I used my low angle A1 blade honed to 27 deg making an effective pitch of 39deg, excellent for end grain as you can see with smooth curly shavings and a good finish.

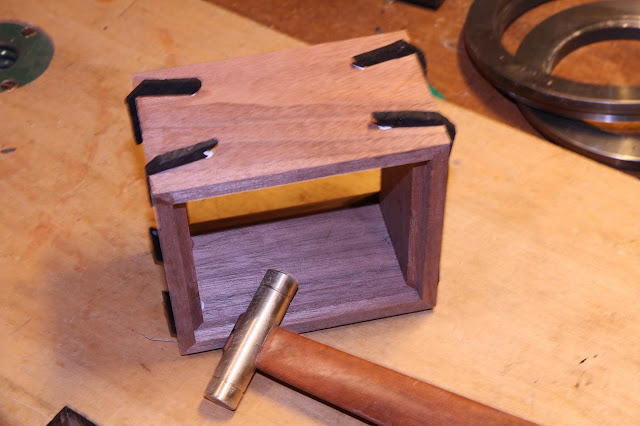
Glued up the mitres to make the box.
I used an aerolastic and corner blocks
to keep it pulled up tight; quite
effective. I used the back of the spline
jig as a square jig for the glue up
- multi tasking or what :-)

That is just a small glue squeeze
out along the edge but managed
to get the grain running nicely
around the outside.

With the sides prepared I needed a jig
to cut the skew spline grooves. This
was quickly made from a few offcuts
and tested with a slotter in the tilting spindle.

Next step was a test on some scrap pine to make
sure it worked

I tried a few options but it went better than I
expected.

I think I was a bit over enthusiastic
at this point with my new found
skills and made the splines a little large.


I had an offcut of ebony which I planed up with
 the BU smoother. What a strange timber to work
coming off in fragmented shavings
Safely glued in
 A quick clean up with the plane was all that was
required for finishing followed by a slap of
Danish oil. I now tend to choose timbers in
advance that I know I can oil finish. Often I do
not do any sanding, finishing straight from the
plane
First surprise on cleaning up was that it was American Black Walnut and not English as thought. The table dates from about 1900 so we have been using ABW for some time!


As ever the bevel up smoother
made a good job but probably
not essential in this case as
ABW is fairly easy to work.

I intended to use skewed, splined
mitres with ebony splines, more
for the fun of making them, so
needed a mitre shooting board to
use my weapon of choice, the
low angle jack.


I glued and extra block against
the back fence to make sure
it stayed put!

Next stage in the timber prep was
to rebate the sides which I did
before cutting to individual lengths
My views of the excellent
skew rebate are already well known.

The jack ran well against the fence/groove arrangement but I later glued an angled guide against the groove to give it some wear life.

In this case I used my low angle A1 blade honed to 27 deg making an effective pitch of 39deg, excellent for end grain as you can see with smooth curly shavings and a good finish.

Glued up the mitres to make the box.
I used an aerolastic and corner blocks
to keep it pulled up tight; quite
effective. I used the back of the spline
jig as a square jig for the glue up
- multi tasking or what :-)

That is just a small glue squeeze
out along the edge but managed
to get the grain running nicely
around the outside.

With the sides prepared I needed a jig
to cut the skew spline grooves. This
was quickly made from a few offcuts
and tested with a slotter in the tilting spindle.

Next step was a test on some scrap pine to make
sure it worked

I tried a few options but it went better than I
expected.

I think I was a bit over enthusiastic
at this point with my new found
skills and made the splines a little large.


I had an offcut of ebony which I planed up with

coming off in fragmented shavings
Safely glued in
 A quick clean up with the plane was all that was
required for finishing followed by a slap of
Danish oil. I now tend to choose timbers in
advance that I know I can oil finish. Often I do
not do any sanding, finishing straight from the
plane
Speaker mounted by silicone directly into the rebate and a ply back finished the job.
Thanks for looking.


